Most people buy a fire pit, set it down on the grass, light a fire, and then spend the rest of the night dragging their chair around to get out of the smoke. The pit is almost never the problem. The site, the base, the fuel, and the airflow are the problem.
I've been building and installing fire features for clients around Asheville for fifteen years, and the setup sequence is the same whether you're dropping a 30-inch bowl into a rental backyard or framing a paver pad for a 47-inch cooking pit. Get the site right, cure the paint, burn dry wood, and a backyard wood burning fire pit becomes the place everyone gravitates toward after dark. Skip those steps and you've bought a smoke machine with legs.
This is the order I run, plus the two pits I'd put on that pad first.
Why you should trust me
I've installed fire pits on gravel pads, bluestone patios, and one unfortunate wood deck that needed a heat shield and a non-combustible base before I would touch it. I've watched thin steel rust through in a single season and I've pulled pits out of client yards that were still solid after a decade because the owner covered them. My own yard has three pits in it right now: a classic wood bowl for the real thing, a smokeless one for family nights, and a gas unit I keep for client events.
Nothing in this article gets a recommendation without a full burn night behind it. Not a test fire. A night with logs, wind, and people sitting around it, because that's the only test that tells you whether the smoke follows you around the fire.
How I picked and how I tested
Both pits below are wood burning, which is the point of this guide. I ran the same fuel through them, seasoned oak and hickory, split and dry, and I ran the same three checks.
First, the steel gauge. It's the number that decides whether a pit lasts a decade or a season, and it's the first thing I look at. Second, the spark screen. If embers can leave the bowl on a gust, the pit isn't finished. Third, the downwind test. I sit where the smoke goes and see how long I can stand it. A pit that smokes you out of your own yard is a fireplace with a seating problem.
The two pits here sit at opposite ends of that test, and they're for two different households. That's on purpose.
The pits I'd put on the pad first
You can spend a lot more money on a fire pit. You can also spend it on a pad, a cover, and a cord of dry hardwood, which will do more for your fire nights than any feature on a spec sheet.
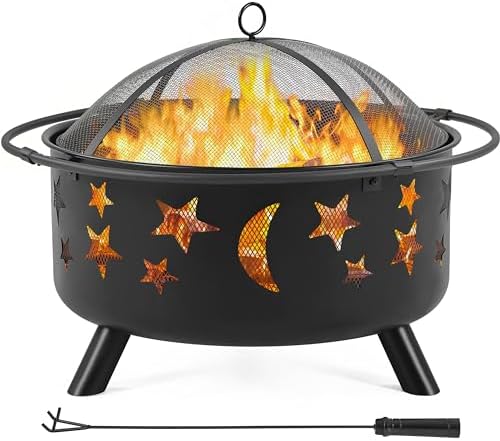
Budget pick: Yaheetech 30in Fire Pits for Outside Wood Burning Outdoor Fireplace
 Visit on Amazon →
Check current Amazon price. This is the pit I point renters and first-timers toward. Thirty inches across is enough for a real fire and two or three chairs pulled up close, and the classic bowl shape means you aren't paying for engineering you don't need. It burns wood the way a fire pit should burn wood, which is the whole ask.
The trade is steel thickness. The bowl is thin, and thin steel is what decides how long a pit lasts. That is not a dealbreaker at this price point, but it does change how you treat the thing. Cover it when it isn't in use. Don't leave ash sitting in the bowl through a wet winter. Expect the finish to fade and surface rust to show up eventually. A pit that rusts through in year one was a decoration, not a purchase. This one is a real fire pit, and it will hold up if you take the cover seriously.
Flaws but not dealbreakers: Budget pits often ship without a spark screen, so if yours doesn't include one, buy one before the first burn. The steel is also light enough that you should not pile the bowl past the halfway mark.
Anyone in a rental, a small yard, or a first house who wants a real fire without a real commitment will be happy here.
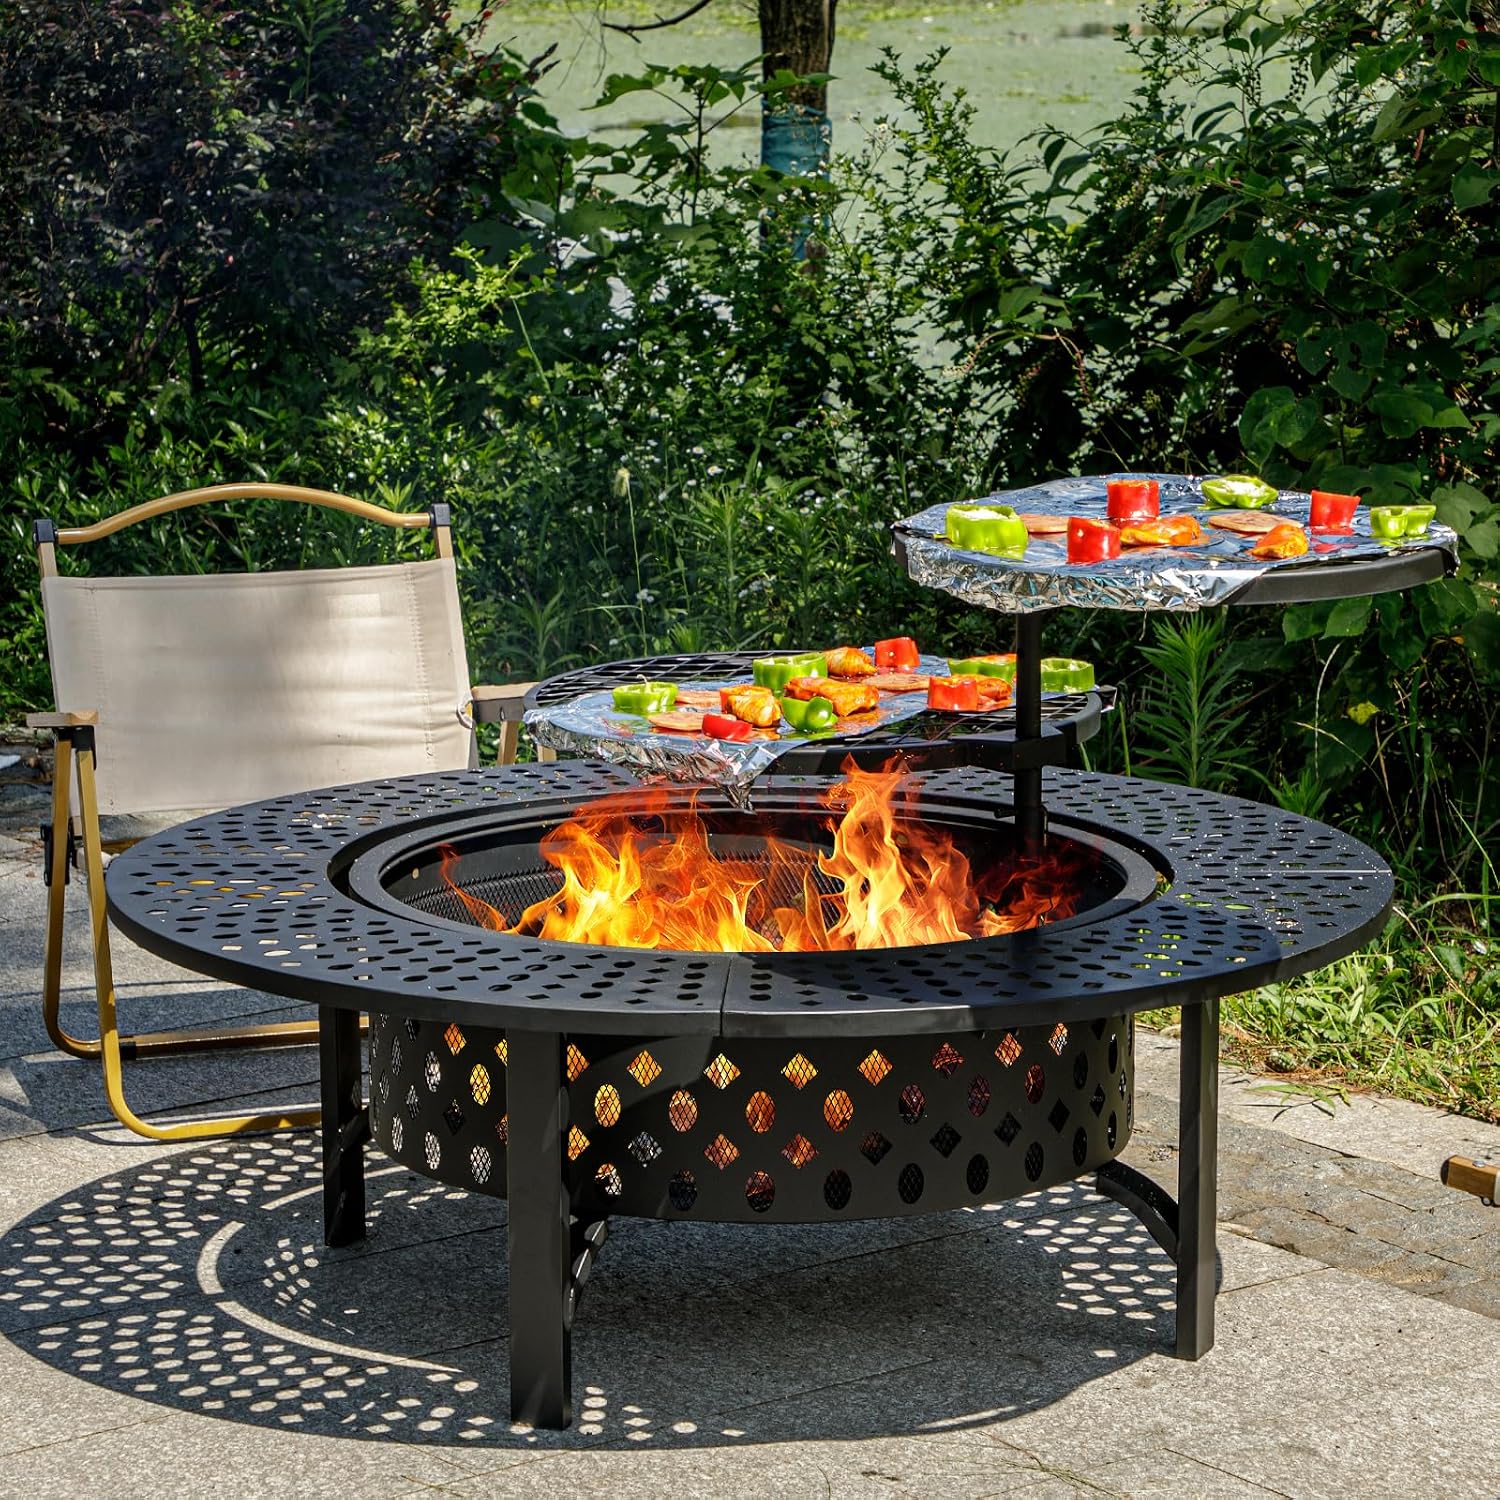
Upgrade pick: OutVue 47 Inch Fire Pit with 2 Grills
 Visit on Amazon →
Check current Amazon price. Forty-seven inches across and two grills, which turns the pit into two tools: a fire for sitting around and a cooking surface for actual dinner. The width is the feature that matters most, because a wide bowl lets you rake coals to one side. Hot zone on one side, cooler zone on the other, and you can cook a steak and hold a pot of beans at the same time.
The extra size is also the catch. A 47-inch bowl takes more fuel to fill, throws more heat, and needs more clearance from anything combustible. It also weighs more, which means it wants a proper pad and not a patch of dry grass. Two grills means two grates to oil and scrub, and you'll be doing that more often than you think.
Flaws but not dealbreakers: It's a big footprint for a small yard. Measure your seating area before you commit, because a pit this size needs room for chairs to sit back from the heat.
Anyone who cooks outside over live fire, hosts a crowd, or wants one pit that does both jobs should start here.
Step one: pick the site before you pick anything else
This is where most setups go wrong, and it's free to get right.
Keep the pit at least ten feet from siding, a fence, a shed, or anything with a roof overhang. Look up. You want no low branches within about fifteen feet overhead, because embers rise and trees drop things into your fire. Check your local fire code and HOA rules before the first burn, since those override any general rule I can give you.
Then look at the surface. A pit does not belong directly on a wood deck, dry grass, or a bed of mulch. It belongs on a paver pad, a gravel bed, or a stone patio. If you're installing on a deck anyway, that install needs a non-combustible pad underneath and around the pit, and a heat shield between the bowl and the railing.
Finally, think about wind. Put the pit in an open corner of the yard, not in a bowl between two walls where smoke has nowhere to go. And keep it on level ground. A pit on a slope rocks, and a rocking pit spills embers.
Step two: build a base that doesn't move
Clear the footprint, then level it. A paver pad over compacted paver sand is the standard, and it takes an afternoon. Set the pavers, check them with a level in both directions, and make sure the pad extends past the bowl on every side by a foot or so. Embers land where they land, and a foot of non-combustible surface around the pit is cheap insurance.
If you want the simplest version, a gravel bed works fine. If you want the simplest version that still looks intentional, a single ring of pavers under the legs does the job.
Whatever you build, keep a charged garden hose or a five-gallon bucket of water within reach of the seating. Not in the garage. Within reach.
Step three: assemble it and check the hardware twice
Legs on, bowl seated, bolts snug. Do not crank them down like you're torquing a lug nut. Heat cycles metal, and a bolt that's tight in April will be looser by August. Check every fastener again after your first burn, and once more at the end of the season.
Then deal with the spark screen. If your pit came with one, it goes on and it stays on. If it didn't, buy one before you light anything. I've seen what an ember does to a deck, and it happens faster than anyone expects.
Step four: the first burn is a cure, not a cook
Most pits ship with a high-heat finish or an oil coating that needs to cure before it's ready for real use. Build a small fire and keep it small for the first 30 to 45 minutes. Let it burn down, let the pit cool completely, and don't cook on it. You'll likely smell the coating burning off, which is normal, and you should keep people back from the bowl while it happens.
This is also the burn where you learn how your pit breathes. Watch where the smoke goes. Watch how fast the fire takes. That information is worth more than any instruction sheet.
Step five: fuel and airflow do the real work
Smoke is unburned fuel. That's the whole lesson. Wet wood smokes because you're spending the fire's heat boiling water out of it, so burn seasoned hardwood, split and dry. No pressure-treated lumber, no plywood, no trash, no cardboard. Nothing but wood and a starter.
Then give the fire air. Start small and build up, because a small hot fire smokes far less than a big smoldering one. Leave gaps between the logs instead of packing the bowl tight. Keep an inch or two of ash in the bottom as insulation. And never fill the bowl past the point where flames touch the spark screen. Half full is a good working level, especially in a thin-walled budget pit.
Step six: manage the smoke instead of fighting it
The smoke follows the person who complains about it. That's not a joke, it's physics and seating. Once the fire is going, move the chairs to the upwind side. If the wind shifts at dusk, and it will, move again. Place seating on two sides of the pit so you always have a choice.
If the smoke won't quit even with dry wood and a hot fire, the fire is too big or the wood is too wet. Fix the fuel before you blame the pit.
Step seven: cook over coals, not flames
Flames blacken the outside of food and leave the inside raw. Coals cook. Let the fire burn down until the logs collapse into a bed of orange coals, then rake them to one side of the bowl.
With a two-grill pit you can run one grate directly over the coal bed for searing and a second grate on the cooler side for anything that needs time. Oil the grate before it goes on, and keep a pair of long tongs and a heat-proof glove within reach. Move food between the hot zone and the cool zone instead of standing there flipping it.
Clean the grates after they cool, every time. A greasy grate left overnight is a greasy grate for the rest of the season.
Safety rules that aren't negotiable
Spark screen on. Never leave the fire unattended, not even for a phone call inside. Water or an extinguisher within reach. Kids and dogs kept a few feet back from the bowl. And check for burn bans before you light up, because a dry fall in the mountains will shut down open burning with no warning.
When you're done, drown it. Water, stir the ash, water again, and check with the back of your hand before you walk away.
Off-season maintenance decides the lifespan
Empty the ash only when the pit is cold, and put it in a metal can, away from the house. Cover the pit or move it under a roof for the winter. If you see rust, hit it with a wire brush and a coat of high-heat paint before it spreads.
That's the whole difference between a pit that lasts a decade and one that's scrap in a year, and it costs you twenty minutes in October.
What this all costs
The setup itself is nearly free. Site selection costs nothing, a gravel base costs a bag of gravel, and a paver pad costs an afternoon and a trip to the hardware store. The pit is the only real line item, and both pits here are listed at Check current Amazon price on Amazon.
The budget bowl is the lower-commitment buy, and the 47-inch two-grill pit is the one that earns its keep if you cook. Either way, budget for a spark screen if yours doesn't include one, and budget for a cover. Those two accessories will outlast the pit if you let them.
The math that actually matters isn't the purchase price. It's how many nights a year you sit out there. A pit that smokes you out gets used twice. A pit on a proper pad, with dry wood and a screen, gets used until the logs are ash.
That's the job. Set it up once, the right way, and let it burn.