Most people buy a fire pit, drop it on the grass, and then spend the whole evening moving their chair because the smoke follows them around like a lost dog. Add a grill grate to the same unit and the problem doubles: now you have grease, ash, and a cooking surface to manage on top of everything else.
A 2-in-1 fire pit and grill is a good answer for a backyard that has to do two jobs on one footprint. It is also the kind of purchase that goes wrong in predictable ways, because the setup decides the outcome far more than the box does.
I have been building and installing fire features in western North Carolina for 15 years. Real pits, on real decks, for people who want to sit outside in November, not just in June. This is the setup walkthrough I would give you in your own yard: where the pit goes, how the first burn should go, how to cook on it without torching dinner, and how to keep the ash and grease from wrecking whatever is underneath.
Why you should trust me
Fifteen years as an outdoor guide and landscape designer, and more fire pits built than campfires attended, which is saying something given how much time I spend in the woods. I have installed everything from $50 chimineas that cracked in a single season to steel units in client backyards that cost more than my first truck.
I own three pits. A smokeless one for family nights, a classic wood pit for the nights I want the real thing, and a gas one for client events where nobody wants smoke in their hair. I have also replaced more than one deck board because somebody set a hot pit down on wood and walked away.
Three rules run through everything below. Steel thickness decides lifespan. Smoke management is the feature, not the accessory. And the spark screen is not optional. I have seen what an ember does to a deck.
How I judge a fire pit and grill before I recommend one
I do not recommend a pit without checking the same four things, every time.
Steel gauge, first. The thickness of the metal is the whole lifespan of the unit. A thin pit is a one-season novelty. Real steel takes a decade of burns and a decade of rain. If the sidewall flexes when you press on it, it was a decoration, not a purchase.
Airflow, second. A fire needs oxygen from below and around the fuel, and the smoke needs somewhere to go that is not your face. Low cutouts and vents matter more than the shape of the bowl. A pit that only pulls air from the top gives you a lazy, smoky fire, and your guests spend the night shuffling their chairs six inches at a time.
The surface under it, third. Embers drop. Grease drips. Ash blows sideways in a gust. A pit on a wood deck without something between the metal and the boards is a repair bill with a fire in it.
Serviceability, fourth. Can you get the ash out without flipping the unit over? Is there a real spark screen? Those two features separate a pit you use every week from one that sits in the corner by August.
That is the test. Steel, airflow, surface, serviceability.
The pit that does both jobs
A dedicated fire pit is a better fire pit. A dedicated grill is a better grill. But most backyards do not have room for both, and a 2-in-1 earns its footprint by letting one unit handle the evening fire and the burgers that come before it. The trick is knowing which mode you are in and setting the unit up for that, instead of trying to do both at once.
Our pick: Fire Beauty Heavy Duty Square Cutout 2-in-1 Outdoor Fire Pit & Grill
 Visit on Amazon →
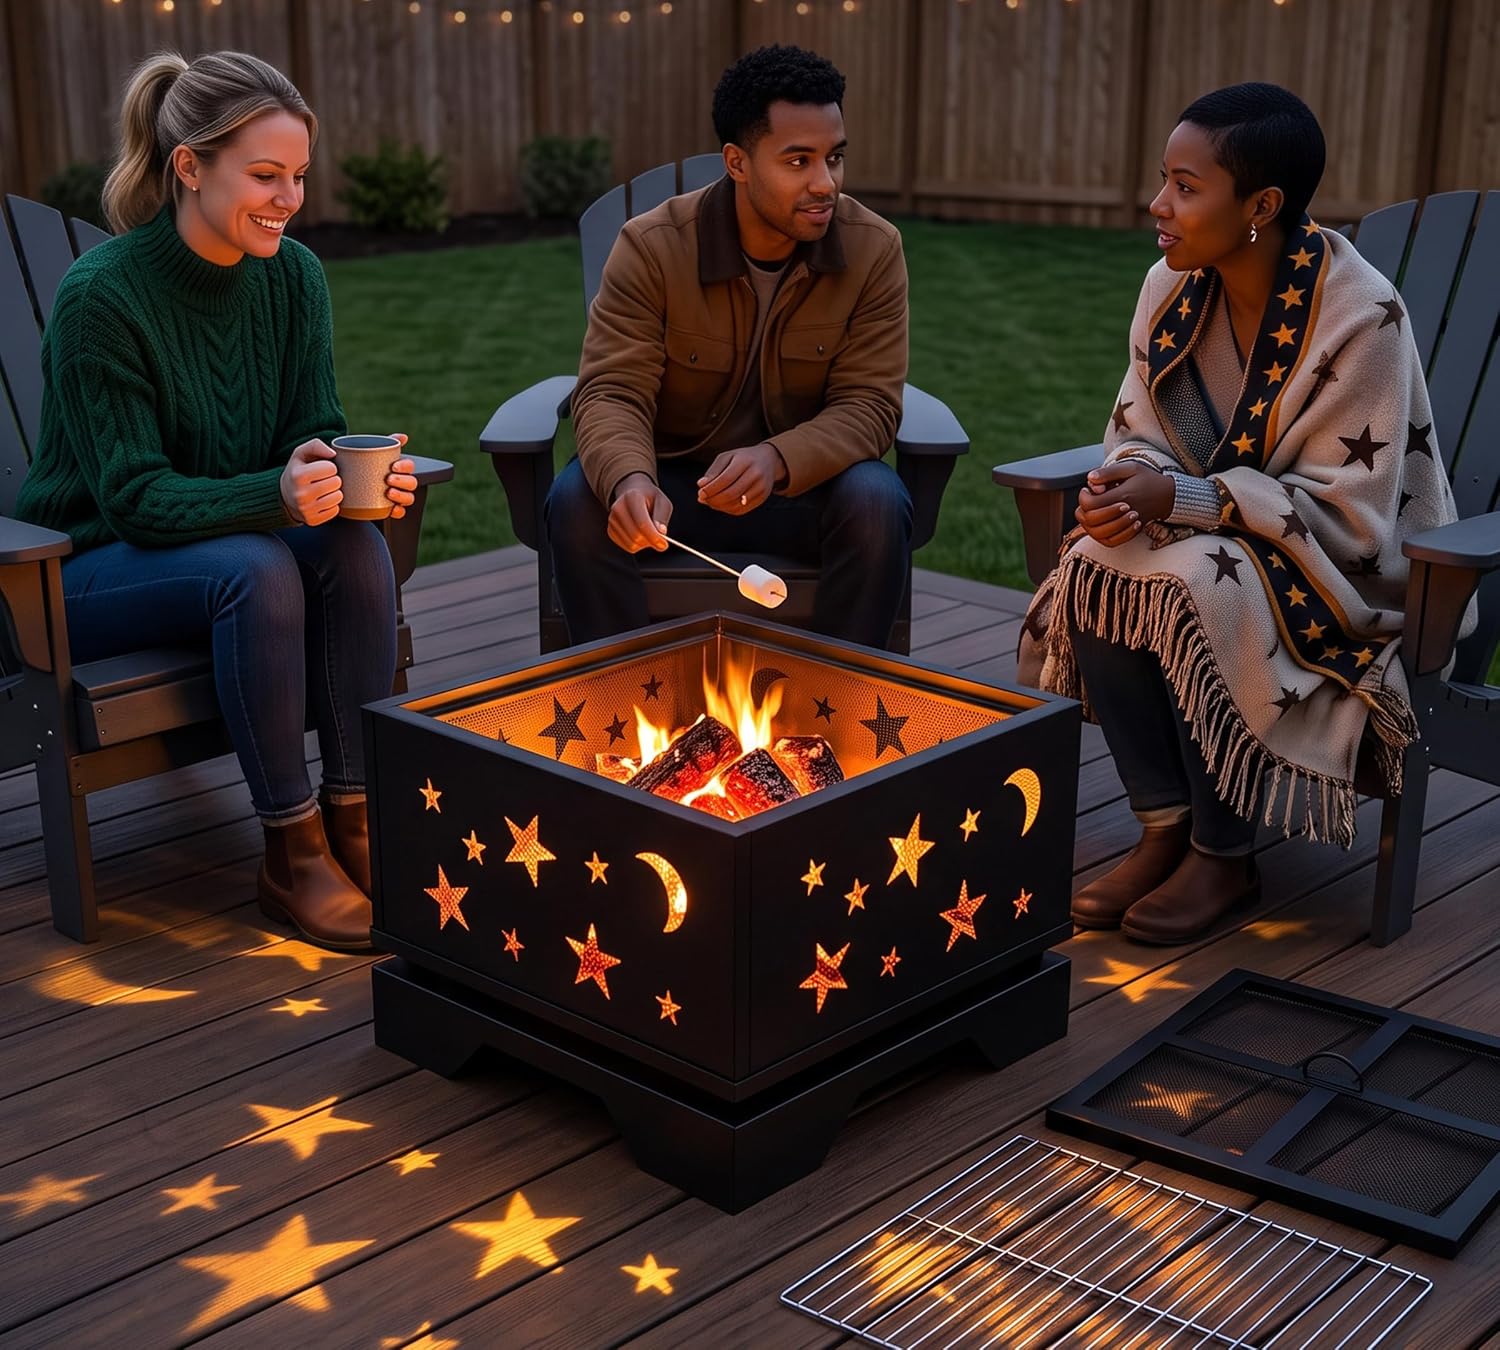
This is the unit I would start with for a backyard that has to switch between fire and food. The name tells you the two things that matter: heavy duty construction, and a square cutout design that feeds air in low, where the fire can actually use it. Low airflow is what keeps a fire burning clean instead of smoldering, and it is the difference between a pit you sit around and a pit you stand upwind of.
The 2-in-1 part means a grill grate that drops over the firebox, so the same bed of coals that warms your hands can cook your dinner. That is a real advantage on a weeknight, because you are not lighting two fires or hauling out a second appliance. It is also the reason setup matters more here than it does on a plain pit. Grease has to go somewhere, ash has to come out, and the grate has to sit level or your food slides to one side.
Check current Amazon price before you commit, and measure your space first. A square footprint seats differently than a round one, and you want a foot of clearance on every side so people can move around it without stepping into the fire ring.
Flaws but not dealbreakers: A 2-in-1 is a compromise by design. It will not sear like a dedicated charcoal grill and it will not burn like a purpose-built smokeless pit. If you cook over fire three nights a week, buy two units. If you cook over fire twice a month, this is the smarter buy.
Anyone with a small yard, a patio, or a rental where one footprint is all you get will get the most out of this.
The gear that keeps the mess off your deck
The pit is the easy part. The mess is what people forget, and it shows up as a scorched board, a grease stain that never comes out, or a rust ring where ash sat wet all winter.
The support pick: GORILLA GRIP LeakGuard Under Sink Mat for Kitchen Cabinet, 24x24 Black
 Visit on Amazon →
Let me be straight about what this is. It is an under-sink cabinet mat, 24 by 24 inches, built to catch drips and keep a cabinet floor from warping. It is not a fireproof pad and it is not a substitute for a non-combustible base under the firebox. Do not put it under a burning fire.
What it does well is contain the two messes a fire pit and grill create. Put one under your ash bucket or your fire-starting tote, and the fine gray dust that normally ends up ground into a garage floor stays on the mat, where you can shake it out. Put one under the grill side of the setup on a patio, and the grease that drips off the grate lands on rubber instead of concrete, which is the difference between a rinse and a stain you look at for three years.
The 24 by 24 size covers a standard bin footprint, and the LeakGuard lip is what makes it work: it holds what lands on it instead of letting it run off the edge. Check current Amazon price, because this is one of those small buys that saves a much bigger cleanup.
Flaws but not dealbreakers: It is a kitchen product doing a garage and patio job. It will not survive being left out in the sun all summer, and it is not built for hot ash. Let ash cool completely before it goes anywhere near this.
Anyone who stores fire supplies in a bin or cooks on a patio will find a use for it.
The actual setup workflow
Now the part you came for. This works for any wood-burning fire pit with a grill grate. Do it in this order.
Step one: Pick the spot like it matters, because it does. Ten feet of clearance from the house, the fence, the shed, and anything else that burns. Not under a roof overhang, not under tree branches, not on a slope where a log can roll. Then spend two evenings watching which way the breeze moves across your yard at fire time. Position your seating upwind. Smoke follows whoever complains about it, and that is usually the person who chose the chairs.
Step two: Build a base that is not wood. On grass, scrape the sod back and set the pit on pavers, gravel, or stone. On a deck, use a non-combustible pad or paver under and around the unit, and check your local rules and the clearance requirements that come with the unit. This is the step people skip and it is the one that costs the most to fix.
Step three: Do a break-in burn. First fire small, and no cooking. New metal expands, coatings cure, and paint smells. You want that to happen on a night when nobody is holding a plate. Keep the first burn short and let the unit cool on its own.
Step four: Load the fuel correctly. Seasoned hardwood, split small enough that you can build a loose stack with air between the pieces. Tightly packed wood smolders. Loose stacked wood burns. Do not use softwoods for cooking, since the resin flavors everything, and never burn pressure-treated lumber or trash.
Step five: Manage the smoke. If smoke is rolling off the top and hanging in the yard, you need more air from below, not a taller flame. Clear any ash blocking the cutouts, spread the coals, and give the fire more room. If smoke is still following people around, move the seating. That is the fix. No gadget beats sitting on the right side of the fire.
Step six: Switch to grill mode on coals, not flames. Wait until the fire has burned down to a bed of glowing coals with gray ash on top. Spread them in a single even layer. Grate close to the coals for a sear, higher up to finish. Flames are for ambiance. Coals are for cooking.
Step seven: Handle ash like it is still on fire, because it might be. Embers hide in ash piles for a day or longer. Let everything cool for 24 to 48 hours, then shovel into a metal container with a lid. Never plastic, never a paper bag, never the garage floor. This is where the mat comes in, under the bucket, not under the fire.
Step eight: Cover it and check the drainage. Water is what kills fire pits, not fire. Once the unit is cool, cover it, and make sure the cutouts and any drain points are not plugged with ash so rain does not pool in the firebox. A pit that holds water rusts from the inside out, and it does it in one winter.
What this setup is not
A 2-in-1 fire pit and grill is not a smoker and it is not a built-in masonry pit. If you want low-and-slow barbecue, buy a smoker. If you want a permanent feature that matches the patio, hire a mason and build it. Trying to make one unit do those jobs is how people end up with a bad brisket and a rusted firebox.
The mat is also not fire protection. It is a drip and dust mat for the mess around the fire, not the fire itself. Keep the two jobs separate and both products do exactly what they are supposed to do.
What this actually asks of you
The money is the small part. Check current Amazon price on the pit and on the mat, and you are looking at one main purchase plus a small one. The rest is time.
Budget an afternoon for site prep and the base, because that is the part you only do once. Budget 30 to 45 minutes from match to coals if you want to cook, which is why I treat grill mode as a weekend and long-evening thing, not a Tuesday night rush. Budget 20 minutes for cleanup, including the ash bucket and the mat.
Do the site prep right and the rest is routine for years. Skip it and you will spend the same afternoon rebuilding it after the first windy night.
Fire is simple. Steel, airflow, and what is under the pit are the hard parts. Get those three right and you have a backyard people stay in until the logs are ash.